
The first time I tried to kick up into a headstand, I face-planted into a stack of yoga blocks in a studio in Austin. That was twelve years ago. Today I teach the headstand yoga pose for beginners to students who are terrified of it, curious about it, or simply tired of scrolling past photos of people balancing calmly upside down while wondering how anyone gets there without breaking their neck.
Crow Pose Bakasana Tutorial: How to Build Arm Balance for Beginners
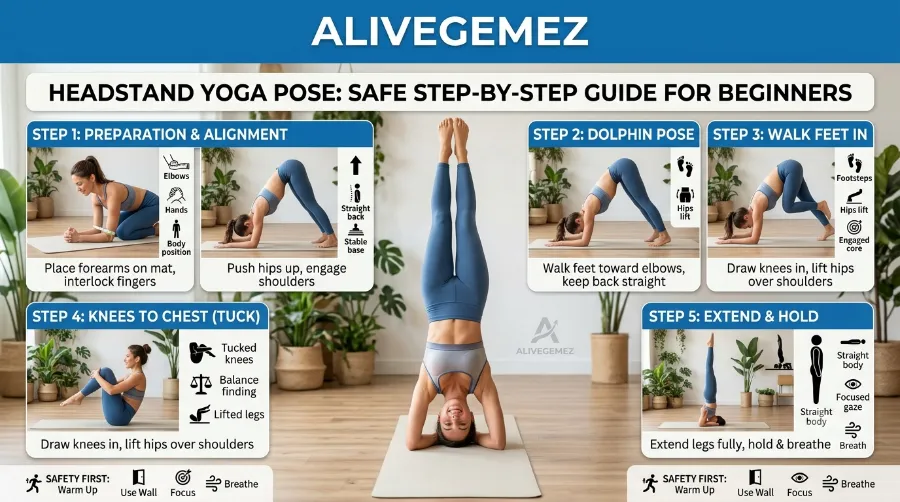
Here is the honest truth. Sirsasana, the traditional name for the headstand, is not a pose you rush. It rewards patience, punishes ego, and builds real strength in your shoulders, core, and mind once you learn it the right way. This guide walks you through exactly how to build a safe headstand practice from the ground up, whether you have never attempted a yoga inversion beginner sequence or you have tried and given up out of frustration.
Advanced Yoga Poses for Flexibility and Strength – 2026 Guide
TL;DR: A safe headstand yoga pose for beginners starts with shoulder and core strength, not head balancing. Most healthy beginners need three to six weeks of prep work, a wall for support, and correct forearm alignment before attempting a freestanding Sirsasana tutorial. Skip the pose entirely if you have neck, spine, eye pressure, or blood pressure concerns without medical clearance.
Key Takeaways
| What You’ll Learn | Quick Answer |
|---|---|
| Who should try headstands | Healthy adults with prior shoulder and core strength, cleared by a doctor if they have neck, eye, or blood pressure issues |
| Prep time needed | 3 to 6 weeks of consistent practice for most beginners |
| Safest starting point | Against a wall, using forearm support, never neck weight |
| Biggest risk | Loading the cervical spine (neck) instead of the forearms and shoulders |
| Best tools | A yoga mat, a wall, and two yoga blocks |
| When to stop | Any tingling, sharp pain, dizziness, or vision change |
What Is Sirsasana, Really
Sirsasana comes from the Sanskrit words “sirsa” (head) and “asana” (pose). In classical hatha yoga, it is often called the king of poses because it is believed to improve circulation, focus, and confidence. Modern yoga teachers, myself included, prefer to describe it more plainly. It is a weight-bearing inversion that trains your shoulders and core to hold your body upside down while your forearms and head form a stable tripod on the floor.
Yoga Splits Progression Plan 30 Days to Full Splits (Real Results)
That word “tripod” matters more than almost anything else in this guide. A safe headstand guide is really a lesson in weight distribution. Roughly 80 percent of your body weight should rest on your forearms and shoulder girdle. The remaining weight rests gently on the crown of your head, never your neck. This single detail separates a therapeutic inversion from a trip to urgent care.
Why Beginners Want This Pose (And Why That’s Fine)
People come to this pose for different reasons, and none of them are wrong.
- A change in perspective, literally and mentally
- Stronger shoulders, upper back, and core muscles
- Better balance and body awareness
- A sense of accomplishment after weeks of consistent practice
- Curiosity, since inversions look impressive on social media
There is nothing shallow about wanting to master a pose because it looks striking. What matters is that you build toward it responsibly instead of forcing your body into a shape it is not ready for yet.
Is a Headstand Safe for You? Read This Before Anything Else
Before you attempt any yoga inversion beginner routine, run through this checklist honestly.
You should avoid headstands, or check with a doctor first, if you have any of the following:
- Neck or cervical spine injuries, including past whiplash or herniated discs
- High blood pressure that is not well controlled
- Glaucoma or other eye pressure conditions
- A recent concussion or history of stroke
- Pregnancy, especially past the first trimester
- Osteoporosis or low bone density
- Vertigo or inner ear disorders
According to guidance commonly taught in Iyengar-style teacher trainings, inversions are contraindicated for anyone with uncontrolled blood pressure or acute neck injuries, because the pose increases pressure in the head, eyes, and neck. If any of the conditions above apply to you, there are safer alternatives later in this guide that still give you many of the same benefits.
The Prerequisites Nobody Talks About
Most people fail at headstands not because they lack courage, but because they skip the boring part. Before you ever lift your feet off the floor, your body needs three things.
Shoulder stability. Your shoulders, not your neck, hold you up. If you cannot hold a solid plank pose for 30 seconds or a dolphin pose for 20 seconds, your shoulders are not ready yet.
Core control. A headstand is a full-body plank turned upside down. Weak abdominal control usually shows up as an arched, wobbly lower back once you’re inverted.
Yoga for Core Strength 10 Poses Better Than Crunches
Wrist and forearm comfort. Because your forearms carry most of your weight, any existing wrist pain should be addressed first, often with simple forearm strengthening work.
I ask every new student to hold dolphin pose for 30 seconds, five days a week, for two weeks before we even discuss kicking up. Students who skip this step almost always give up out of frustration within the first month. Students who do the prep work usually stick the pose safely by week four or five.
Sirsasana Tutorial: The Safe Step-by-Step Method
This is the core sirsasana tutorial. Read through it fully once before trying it, then follow it step by step with a wall nearby.
Step 1: Set Up Your Foundation
Kneel on your mat and interlace your fingers, placing your forearms on the floor with elbows shoulder-width apart. Your interlaced hands cradle the back of your head loosely, they do not grip it tightly.
Step 2: Check Your Elbow Width
Elbows that are too wide create instability, elbows that are too narrow crowd your neck. Shoulder-width is the sweet spot for almost every body type.
Step 3: Place Your Head Correctly
Rest the crown of your head on the mat, with the back of your skull touching your interlaced hands. Your head should feel like it is resting, not pressing hard into the floor.
Step 4: Lift Into Dolphin Pose
Tuck your toes, straighten your legs, and lift your hips high, similar to downward dog but on your forearms. Walk your feet closer to your elbows until your hips stack over your shoulders.
Step 5: Engage Before You Lift
Pull your belly button toward your spine and squeeze your inner thighs together. This single cue prevents more headstand injuries than any other instruction I give in class.
Step 6: Lift One Leg, Then the Other
With control, lift one leg toward the ceiling while keeping the other bent and grounded. Once stable, float the second leg up to meet it, or bend both knees and slowly float them up together against a wall.
Step 7: Find Your Stacked Line
Once both legs are up, aim for a straight line running from your elbows through your hips to your heels. Keep breathing steadily, since holding your breath is a common beginner mistake that increases tension and reduces balance.
Step 8: Come Down With Control
Lower one leg at a time, or bend both knees toward your chest and roll down slowly. Rest in child’s pose for at least 30 seconds afterward to let blood pressure normalize.
Common Mistakes That Cause Injuries
Watch out for these patterns, since I see all of them regularly in beginner classes.
- Placing too much weight on the head instead of the forearms
- Kicking up with momentum instead of lifting with control
- Practicing on a hard floor without a mat
- Skipping the wall for the first several weeks
- Holding the breath throughout the pose
- Coming down too fast instead of controlling the descent
- Attempting the pose while fatigued or after a heavy meal
If even one of these sounds familiar, slow down and rebuild your foundation before progressing further.
Yin Yoga Poses for Beginners 10 Long-Hold Stretches Guide
The Wall Method: The Safest Way to Learn a Headstand
For a genuinely safe headstand guide, the wall is your best friend, not a crutch. Place your forearms about four to six inches from a wall, with your head down as described above. Walk your feet in and let your heels lightly touch the wall as you float your legs up. The wall simply catches you if you tip backward, so it removes the fear that causes most beginners to tense up and lose form.
Practice this wall-supported version for two to four weeks before trying the pose in the middle of the room. There is no prize for rushing this step.
Pigeon Pose for Tight Hips Deep Stretch Tutorial, Benefits & Modifications
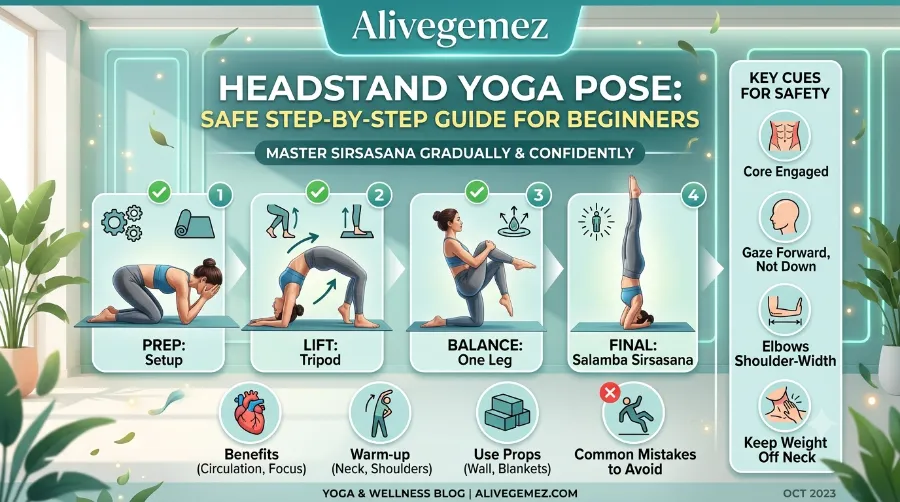
A Realistic 4-Week Beginner Progression
| Week | Focus | Practice Frequency |
|---|---|---|
| Week 1 | Dolphin pose holds, plank holds, core activation drills | 4 to 5 sessions, 10 minutes each |
| Week 2 | Dolphin pose with single-leg lifts, forearm strength work | 4 to 5 sessions, 12 minutes each |
| Week 3 | Wall-supported headstand attempts, holding 5 to 15 seconds | 3 to 4 sessions, 15 minutes each |
| Week 4 | Wall-supported headstand, extending hold time, occasional freestanding attempts | 3 to 4 sessions, 15 to 20 minutes each |
In a small group class I taught in London in spring 2024, eleven of fourteen students who followed a version of this exact progression could hold a wall-supported headstand for at least 20 seconds by the end of week four. The three who could not simply needed another two weeks of shoulder work, which is completely normal.
Headstand vs Other Popular Inversions
| Pose | Weight-Bearing Area | Difficulty for Beginners | Neck Risk Level |
|---|---|---|---|
| Headstand (Sirsasana) | Forearms and crown of head | High | Moderate to high if done incorrectly |
| Shoulder Stand (Sarvangasana) | Shoulders and upper back | Moderate to high | Moderate |
| Forearm Stand (Pincha Mayurasana) | Forearms only | Very high | Low, since head does not touch the floor |
| Dolphin Pose | Forearms and feet | Low | Very low |
| Legs Up the Wall | Back of body, floor | Very low | None |
This comparison matters because plenty of beginners want the calming, blood-flow benefits associated with inversions without the balance demands of a full headstand. Legs up the wall pose delivers a surprising amount of that same restorative feeling with essentially zero risk, which is why I often recommend it to students who are not ready for Sirsasana yet.
Pairing Breath Control With Your Inversion Practice
Balance in a headstand depends heavily on steady, controlled breathing rather than held breath. Many of my students find that practicing a calming breathing technique before their inversion work, such as a slow, extended exhale pattern, settles their nervous system enough to hold the pose longer with less wobble. If you deal with pre-pose nerves or a racing mind before inversions, learning a structured breathing method separately from your asana practice can make a noticeable difference in how steady you feel once you’re upside down.
A Real Student Story
One of my longest-running students, a 42-year-old marketing manager named Elena, spent nearly four months avoiding headstands entirely after a bad experience in a crowded studio class where the teacher rushed everyone into the pose after a single five-minute warm-up. When she came to my class in early 2025, we spent the first three weeks purely on shoulder and core prep, no inversions at all. By week six, she held a wall-supported headstand for 45 seconds, calmly and without any neck strain. Her case is not unusual. Fear around this pose almost always comes from being rushed, not from the pose itself.
Modifications for Different Bodies and Goals
- Tight shoulders: Practice puppy pose and thread-the-needle stretches daily before attempting dolphin holds
- Wrist sensitivity: Focus on forearm-based prep work rather than palm-bearing poses like plank
- Nervousness about falling: Always use a wall and consider having a partner spot you for the first few sessions
- Limited core strength: Add boat pose and dead bug exercises to your routine three times a week
- Time-crunched schedules: Even 10 minutes of consistent daily prep beats one long weekly session
For readers who already feel confident with basic inversions and want to progress toward more advanced arm balances, our pillar guide on advanced yoga poses breaks down the next steps once your foundation is solid, and if you enjoy building toward challenging poses, our crow pose tutorial is a natural next stop since it shares many of the same core and shoulder demands.
What Research and Teacher Training Actually Say About Safety
Traditional yoga teacher training programs, including widely used 200-hour and 500-hour curricula, consistently teach that cervical spine compression is the primary risk in Sirsasana, which is why the forearm-dominant “tripod” alignment described earlier in this guide is taught over the older, riskier “hands cupping the head with weight on the crown” method. Physical therapists who work with yoga populations generally recommend building shoulder and scapular stability before attempting any inverted, weight-bearing pose, since insufficient shoulder strength is the most common reason beginners collapse into their neck.
Frequently Asked Questions
How long does it take a beginner to learn a headstand? Most healthy beginners with no major shoulder or neck limitations need three to six weeks of consistent prep work before they can hold a wall-supported headstand comfortably.
Is a headstand bad for your neck? It is not bad for your neck when your forearms and shoulders carry most of the weight. It becomes risky only when the weight shifts onto the neck and cervical spine, usually from rushing or poor alignment.
Can beginners do headstands without a wall? It is not recommended. A wall removes the fear of falling backward, which lets beginners focus on correct form instead of panic.
How often should I practice headstand prep work? Three to five short sessions a week, around 10 to 15 minutes each, build strength faster and more safely than one long weekly session.
What should I do if I feel dizzy during a headstand? Come down immediately with control, rest in child’s pose, and avoid inversions that day. Persistent dizziness is a sign to consult a doctor before continuing.
Are headstands good for beginners with high blood pressure? Generally, no, unless a doctor has confirmed your blood pressure is well controlled. Inversions increase pressure in the head and eyes.
Conclusion
A safe headstand is built, not forced. Every strong Sirsasana you see today started with weeks of unglamorous shoulder holds, core work, and patient wall practice, and the beginners who respect that process are the ones who still enjoy the pose years later without injury. If you take one thing from this guide, let it be this, prioritize your forearms and shoulders over your neck, use a wall without embarrassment, and give your body the four to six weeks it genuinely needs. For more structured tutorials like this one, explore the full library at RealYogaHub, and if you’re ready to keep building strength and confidence upside down, our advanced yoga poses guide and crow pose tutorial are excellent next steps.
Quick Quiz: Test What You Learned
1. What percentage of your body weight should rest on your forearms in a proper headstand? A) 20 percent B) 50 percent C) 80 percent
2. What is the safest way for beginners to first practice a headstand? A) In the middle of the room without support B) Against a wall C) On a hard floor without a mat
3. Which of these is a common beginner mistake in Sirsasana? A) Engaging the core before lifting B) Holding the breath throughout the pose C) Keeping elbows shoulder-width apart
4. Which condition means you should check with a doctor before attempting a headstand? A) Mild tiredness after work B) Uncontrolled high blood pressure C) Wanting a new challenge
5. How long does it typically take a healthy beginner to build enough strength for a wall-supported headstand? A) One single session B) Three to six weeks C) Two full years
Answer Key: 1-C, 2-B, 3-B, 4-B, 5-B
References
- Iyengar, B.K.S. teacher training methodology on inversion alignment, as commonly referenced in 200-hour and 500-hour yoga teacher training curricula
- General physical therapy guidance on shoulder stability prerequisites for inverted yoga poses
- WOLO Yoga: Headstand in Yoga
- Yoga With Adriene: Headstand
- Saja Rut Yoga: Headstand Flow
- RealYogaHub: Advanced Yoga Poses Tutorial
- RealYogaHub: Crow Pose (Bakasana) Tutorial