
I still remember the first time a student asked me, mid-class, “wait, is shoulder stand actually safe for my neck, or am I about to wreck it?” Fair question. I had been teaching for about four years at that point, and I did not have a confident answer. So I went and found one, through anatomy books, physical therapists, and a lot of trial and error on my own mat.
Twelve years later, here is what I know for certain: shoulder stand is one of the most argued-about poses in modern yoga, and most of the fear around it comes from bad setup, not the pose itself. Sarvangasana can be a genuinely calming, strengthening inversion. It can also strain your neck fast if you skip the details. This guide separates the two.
We are going to walk through what the pose actually does to your body, who should not attempt it, a step-by-step sarvangasana tutorial you can trust, and the modifications that let most healthy adults practice this yoga inversion safely.
TL;DR: Shoulder stand is safe for most healthy adults when the weight sits on the shoulders and upper arms, not the neck, and when a folded blanket protects the cervical spine. It is not appropriate if you have neck pain, uncontrolled blood pressure, glaucoma, recent eye or spine surgery, or if you are pregnant or menstruating heavily, unless your doctor clears you first. Start with legs-up-the-wall and bridge pose before you try the full inversion.
Key Takeaways
| Question | Quick Answer |
|---|---|
| Is shoulder stand safe? | Yes, for most healthy adults, when the setup protects the neck and a teacher checks your alignment |
| Who should avoid it? | People with neck injury, high blood pressure, glaucoma, recent surgery, or pregnancy |
| Biggest risk | Weight collapsing onto the cervical spine instead of the shoulders |
| Best prep poses | Bridge pose, legs-up-the-wall, and supported plow |
| How long to hold | 30 seconds for beginners, building to 3-5 minutes with experience |
| Best counterpose | Fish pose (Matsyasana), held for 30-60 seconds after coming down |
What Sarvangasana Actually Is
Sarvangasana translates loosely to “pose for all body parts,” and it earns that name. In the full expression, your legs point straight up, your torso stays vertical, and your hands press into your upper back for support. Your shoulders and upper arms carry the weight. Your neck stays long, still, and free of pressure.
That last part is the whole game. Shoulder stand asks a lot from the neck, shoulders, and nervous system, and most problems start before the legs ever lift off the ground. If you get the setup right, the rest of the pose tends to fall into place.
This pose sits in the same family as other advanced yoga poses, and if you are building toward it, it helps to have a solid foundation in poses like headstand and general core strength work first. Our pillar guide to advanced yoga poses walks through the whole progression if you want the bigger picture before you dive into this one pose.
Shoulder Stand Benefits: What the Research and Traditional Texts Actually Say
Let’s talk about shoulder stand benefits honestly, without the overselling you see on a lot of yoga blogs.
Traditional yoga texts call sarvangasana “the mother of all poses” because of its wide-reaching effects. B.K.S. Iyengar wrote about it in these exact terms, and he described it as flushing the lymph nodes, helping regulate blood pressure and heart rate, strengthening the diaphragm, and stretching the chest muscles.
From what current research and body mechanics tell us, here is what is genuinely supported:
- Circulation support. Inverting the legs above the heart helps venous blood return from the lower body, which many practitioners feel as reduced heaviness in tired legs after standing or running.
- Shoulder and upper-back strength. Because the pose is isometric, it builds real endurance in the deltoids, scapular stabilizers, and deep neck flexors.
- Nervous system down-shift. Many students report a calmer, quieter mental state after holding the pose with steady breath, similar to what you feel after restorative poses.
- Thyroid-area stimulation. The gentle chin-to-chest position increases blood flow near the thyroid and parathyroid glands, which is why some older yoga texts link the pose to metabolism, though this claim has far more anecdotal support than clinical trial data.
What it is not, is a cure for thyroid disease, a substitute for cardio, or a pose everyone needs in their practice. If a pose does not feel right in your body, poses like boat pose build similar strength and confidence without the inversion risk.
The Thyroid Claim, Explained Honestly
You will read on a dozen yoga sites that shoulder stand “cures” thyroid problems. It does not, and I want to be direct about that because I have had students quietly stop their prescribed thyroid medication because a blog told them a yoga pose would fix it. That is dangerous advice.
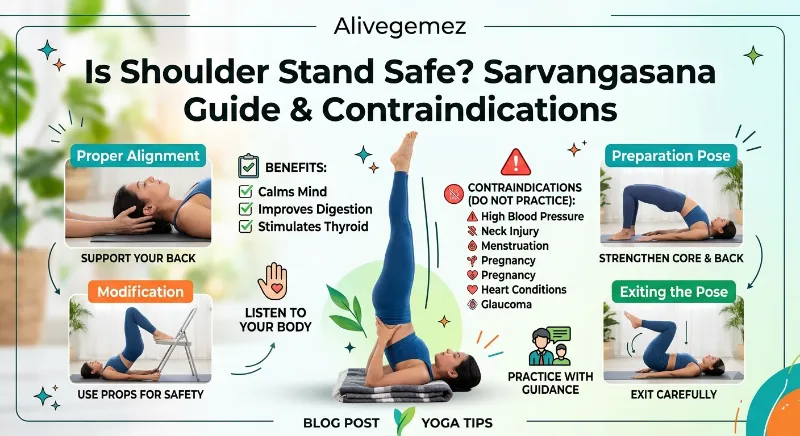
What is true is more modest. The gentle chin-to-chest position increases local blood flow near the thyroid and parathyroid glands, which classical texts interpreted as a metabolic boost. Modern research on yoga and thyroid function exists, but most of it studies broader yoga practice combined with breathing work, not sarvangasana in isolation. If you have a thyroid condition, keep your medication, keep your endocrinologist, and treat shoulder stand as a supportive habit at best, never a treatment.
A Real Case From My Own Teaching
In the spring of 2019, I worked with a 47-year-old marathon runner who came to class with chronically tight hip flexors and a habit of holding shoulder stand for nearly five minutes because she had read longer was better. Her neck ached most days. We dropped her hold time to 45 seconds, added two extra blankets under her shoulders, and spent six weeks building strength in bridge pose first. By week seven, she held the full pose for two minutes with zero neck discomfort. The lesson was not that shoulder stand was unsafe for her. It was that her setup and pacing were wrong, not the pose itself.
Is Shoulder Stand Safe? Here Is the Honest Answer
Short version: shoulder stand is safe for most healthy adults, with three conditions. You need decent shoulder and upper-back strength, a teacher or video guide who checks your alignment, and patience to build up gradually instead of forcing the full pose on day one.
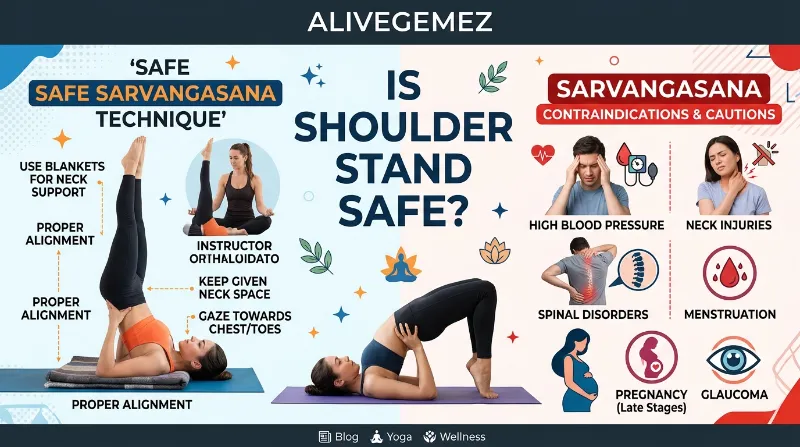
Longer version: the safety question depends entirely on where the load lands. Yoga teachers who study this pose closely point out specific situations where shoulder stand is not indicated, including high blood pressure, a neck injury, glaucoma, or a cervical spine condition such as arthritis or degenerative disc disease. Outside those situations, many yogis can safely find comfort and ease in this inversion, or in a modified version of it.
Here is the anatomy piece that actually matters. The cervical spine is made of seven vertebrae, and the topmost one, called the atlas, allows roughly a 50-degree range of flexion and extension against the skull, with the vertebrae below it adding smaller amounts of movement each. That mobility is a gift for daily life. It is also exactly why the neck is a poor foundation for a pose that puts your full body weight overhead.
When your arms extend fully behind you in shoulder stand, your hands and elbows act almost like a doorstop, distributing weight over the tops of your shoulders and the backs of your upper arms instead of your neck. Get that mechanic right, and the pose stops being a neck risk and becomes a shoulder-and-core strength builder.
Who Should Skip Shoulder Stand
Some of these are permanent no’s. Some are temporary, until you talk to a doctor or physical therapist.
- Diagnosed neck pain, cervical disc disease, or a prior neck injury
- Uncontrolled high blood pressure or a diagnosed heart condition
- Glaucoma, retinal issues, or recent eye surgery of any kind
- Recent surgery on the neck, shoulder, spine, or abdomen
- Pregnancy, unless your prenatal-certified teacher and doctor both clear it
- Severe reflux (GERD) or a hiatal hernia, since inversions can worsen symptoms
- Active sinus infection, severe migraine, vertigo, or a balance disorder
- Osteoporosis significant enough to raise fracture risk in the neck or spine
If any of these apply to you, the safest move is to avoid the pose or only attempt a modified version under a clinician and a qualified teacher’s guidance. This is not the pose to push through pain on. Discomfort in the neck is a stop signal, not a warm-up sensation.
Why Each Contraindication Exists
It helps to understand the reasoning instead of just memorizing a list.
- Neck pain or disc disease: the pose loads the exact structures that are already compromised, and inversion pressure can worsen a bulging or herniated disc.
- High blood pressure or heart conditions: inverting the body changes venous return and can spike pressure in the head and eyes temporarily, which is risky if your baseline pressure is already high.
- Glaucoma or eye surgery: inversions increase intraocular pressure, which is exactly what glaucoma treatment tries to avoid.
- Pregnancy: balance shifts, ligaments loosen, and abdominal pressure changes make most full inversions unnecessary risk during this window.
- GERD or hiatal hernia: being upside down can let stomach acid move the wrong direction, which is uncomfortable at best and harmful at worst.
- Sinus infection or vertigo: inversion pressure can intensify head pressure and dizziness that is already present.
- Osteoporosis: reduced bone density in the cervical spine raises fracture risk under any sustained load, even a supported one.
None of these are about willpower or flexibility. They are about physiology, and no amount of practice makes an unsafe situation safe.
Modifications and Props for Every Body
Not every body needs the same version of this pose, and that is not a consolation prize. Modified versions offer real benefits with far less risk.
- Wall-supported shoulder stand: rest your legs up a wall with your hips slightly lifted on a folded blanket. This gives most of the circulatory benefit with almost none of the neck loading.
- Chair-supported shoulder stand: used often in restorative and therapeutic yoga classes, where the shins rest on a chair seat and the shoulders stay on the floor, taking core demand almost entirely out of the pose.
- Half shoulder stand against a wall: feet pressed into the wall with knees bent at a right angle, a good stepping stone for building trust in the position.
- Bolster-under-hips variation: for tighter hamstrings or hips, a bolster under the lower back before lifting the legs can ease the transition into the full shape.
If your goal is simply better circulation and a calmer nervous system, the wall-supported version delivers most of that benefit with a fraction of the risk, and it is a perfectly respectable long-term practice on its own, not just a stepping stone.
If you are managing tight hips or a cranky lower back instead, a gentler place to build mobility is pigeon pose, which carries almost none of the inversion risk.
Sarvangasana Tutorial: How to Set Up the Pose Step by Step
This is the part most tutorials rush. Do not rush it.
What you need: two or three folded blankets, a yoga mat, and a wall nearby for your first few attempts.
- Stack your blankets at the short end of your mat, folded to about two inches thick, with a clean edge lined up where your shoulders will land.
- Lie down with your shoulders on the blanket edge and your head on the bare mat, off the blanket. This single detail is what keeps the neck long instead of jammed.
- Bend your knees and press your feet into the floor, arms flat by your sides, palms down.
- Press into your hands and feet and lift your hips, rolling your legs up and over your head, similar to the setup for plow pose.
- Bring your hands to your lower back for support, elbows drawn in toward each other so they do not splay wide.
- Straighten your legs toward the ceiling one at a time, or both together if your core is ready.
- Press your upper arms down into the blanket actively. This is the step that takes weight off your neck.
- Hold for 15-30 seconds as a beginner, breathing steadily through the nose.
- Come down slowly, rolling through the spine one vertebra at a time, then rest.
- Follow with fish pose or a supported backbend for 30-60 seconds to counter the neck flexion.
A quick note on hand position, since this trips up a lot of intermediate students. The classic version keeps the hands flat against the mid-back with fingers pointing up toward the shoulder blades. A more accessible variation, sometimes used in therapeutic classes, keeps the hands lower on the ribs, which reduces the demand on shoulder flexibility while you build strength. Neither version is “more correct.” Pick whichever lets you keep your neck relaxed and your breath steady.
If any part of this feels unstable, practice against a wall first. Pressing your feet lightly onto a wall behind your head takes weight off your shoulders temporarily and gives you room to feel the outward rotation in your upper arms before you try the full pose.
Common Setup Mistakes That Cause Neck Strain
- Letting the head rest on the blanket instead of the floor, which crunches the cervical spine
- Turning the head while inverted, ever, for any reason
- Letting the elbows splay out wide instead of hugging in toward the ribs
- Rushing into the full pose before building shoulder and core endurance in prep poses
- Holding the breath instead of breathing steadily through the nose
Breathing Through the Pose
Breath is where most beginners lose their composure in shoulder stand, and it is also the easiest fix. The chest is compressed slightly by the chin-to-chest position, so shallow chest breathing feels harder than usual. Instead, focus on slow, even nasal breathing that expands the lower ribs and belly rather than the upper chest. If you notice yourself holding your breath, that is usually a sign you have gone past your comfortable range, and it is worth coming down a few seconds earlier next time.
A steady breath also tells you something useful about your alignment. If your breath feels tight and panicked, your weight has probably shifted onto your neck or your chest is over-compressed. If your breath feels smooth, your setup is doing its job.
Shoulder Stand vs. Other Inversions: A Quick Comparison
Since a lot of readers land here comparing options, here is how sarvangasana stacks up against other common inversions.
| Pose | Load-Bearing Area | Skill Level | Neck Risk Level | Good First Inversion? |
|---|---|---|---|---|
| Shoulder Stand (Sarvangasana) | Shoulders, upper arms | Intermediate | Moderate if misaligned | With blanket support, yes |
| Headstand (Sirsasana) | Forearms, crown of head | Advanced | High if misaligned | No, build up to it |
| Legs-Up-the-Wall | Sacrum, back of legs | Beginner | Very low | Yes, best starting point |
| Plow Pose (Halasana) | Shoulders, upper back | Intermediate | Moderate | Good bridge pose to shoulder stand |
| Bridge Pose | Feet, shoulders | Beginner | Very low | Excellent prep pose |
If you are newer to inversions generally, our guide to headstand for beginners breaks down a similar progressive approach, and it is worth reading before you attempt either pose cold.
How Often and How Long to Practice
For most healthy practitioners building experience, here is a realistic timeline.
- Weeks 1-2: Legs-up-the-wall and bridge pose daily, no full inversion yet
- Weeks 3-4: Supported shoulder stand against a wall, 15-20 seconds, two to three times a week
- Month 2 onward: Full pose away from the wall, building from 30 seconds toward 1-2 minutes
- Experienced practitioners: 3-5 minutes is common, though longer is not automatically better
There is no prize for holding it longer than your alignment can support. A clean 30-second hold beats a shaky three-minute one every time.
Who Benefits Most From This Pose
Not every reader here has the same body or the same goals, so let’s get specific about who tends to gain the most from a well-set-up shoulder stand practice.
- Desk workers in their 30s and 40s often carry forward-head posture from hours at a screen. The strength this pose builds in the upper back and deep neck flexors can help counter that pattern, though it should be paired with regular movement breaks during the workday, not used as a replacement for them.
- Runners and cyclists frequently deal with heavy, tired legs after long training blocks. The inverted position gives gravity-assisted circulatory relief that many athletes describe as similar to using compression socks, just without the socks.
- Women in perimenopause sometimes look to inversions as part of a broader stress-management routine, since the pose paired with slow breathing tends to lower a racing mind more than upright poses do. This is a wellness benefit, not a hormonal treatment.
- Intermediate yoga students building toward headstand often use shoulder stand as a stepping stone, since it develops similar shoulder and core awareness with a gentler entry point.
If none of these describe you, that is fine too. Plenty of excellent practices skip inversions entirely, and there is no rule that says every yogi needs this particular pose in their routine.
A Safety Checklist Before You Go Upside Down
Run through this quickly before every session, especially in the first few months of practice.
- Blankets are folded and positioned so your shoulders, not your head, take the height.
- You have warmed up with bridge pose or gentle backbends first.
- You are not currently dealing with a cold, sinus pressure, or a headache.
- Your blood pressure and any relevant medical conditions are under control and cleared by your doctor if needed.
- You have at least one prep pose in your recent practice history, rather than attempting this cold.
- You have a plan for how you will exit the pose slowly, rather than dropping out of it.
Warning Signs to Stop Immediately
| Sign During the Pose | What It Usually Means | What to Do |
|---|---|---|
| Sharp neck pain | Weight has shifted onto the cervical spine | Come down slowly, skip the pose that session |
| Throbbing or pulsing in the head | Blood pressure response to inversion | Come down, rest in a seated position, check with a doctor if it recurs |
| Tingling or numbness in the arms | Nerve compression from poor shoulder positioning | Come down, reset your blanket height and elbow position |
| Shaky breath or panic feeling | Weight distribution or duration is past your current capacity | Reduce hold time next session |
| Eye pressure or visual spots | Increased intraocular pressure | Come down immediately and avoid inversions until cleared by an eye doctor |
Practical Notes From Teaching This Pose for Over a Decade
A few things I have noticed working with real students, not just textbook cases. Tight-shouldered desk workers almost always need more blanket height than yoga photos suggest, sometimes three or four folded blankets instead of two. Runners and cyclists often have the opposite issue: strong shoulders but a stiff upper back, so plow pose as a warm-up makes a bigger difference for them than for anyone else.
I have also noticed that most neck tweaks happen on the way down, not during the hold. Rushing the exit, letting the legs drop instead of rolling down with control, is a bigger cause of soreness than the pose itself. Slow the descent down and most of that goes away.
For readers who want a pose that trains similar upper-body control without the inversion element at all, crow pose is a great complementary challenge, since it builds the same wrist, shoulder, and core coordination in an upright position.
Common Myths About Shoulder Stand, Debunked
Myth: Longer holds are always better. Not true. A clean 30-second hold with correct alignment builds more benefit and less risk than a shaky five-minute hold where your weight has drifted onto your neck.
Myth: Everyone should work toward the full pose eventually. Not true. If you have a contraindication, the wall-supported or chair-supported version is a complete practice on its own, not a lesser substitute.
Myth: Pain means you are getting a deeper stretch. Not true. Sharp or radiating pain in the neck is a stop signal, always. Muscle fatigue in the shoulders is normal; nerve-type pain in the neck is not.
Myth: Shoulder stand will fix your thyroid, your metabolism, or your hormones. Not true, at least not on its own. It may support general well-being alongside proper medical care, but it is not a treatment for diagnosed conditions.
Myth: You need to be flexible to do this pose safely. Not quite. You need shoulder and core strength and patient alignment more than flexibility. Plenty of stiff-shouldered beginners do this pose safely; plenty of very flexible people injure their necks by skipping the setup.
Frequently Asked Questions
Is shoulder stand safe for beginners? Yes, if you build up through prep poses first and use a folded blanket under your shoulders. Jumping straight into the full pose without that foundation is where most beginner strain happens.
Can shoulder stand hurt your neck? It can, specifically if your head rests on a raised surface instead of the floor, or if your weight collapses onto your neck instead of your shoulders and upper arms.
Is sarvangasana safe during pregnancy? Generally, no, unless a prenatal-certified teacher and your doctor both approve a modified version. Most prenatal programs skip full inversions entirely.
How long should I hold shoulder stand? Start at 15-30 seconds and build gradually. Experienced practitioners often hold for 3-5 minutes, but duration should always follow quality of alignment, not the other way around.
What is the best counterpose after shoulder stand? Fish pose (Matsyasana), held for 30-60 seconds, gently extends the neck in the opposite direction from the flexion held during shoulder stand.
Do I need a yoga block or blanket for shoulder stand? A folded blanket under the shoulders (not the head) is close to essential for most bodies. It creates space so the neck does not bear weight.
What is the difference between shoulder stand and headstand? Shoulder stand loads your shoulders and upper arms, while headstand loads your forearms and the crown of your head. Shoulder stand generally carries a gentler risk profile for the neck when set up correctly, but headstand demands more balance and core control.
Can I do shoulder stand every day? Most practitioners do fine with three to five sessions a week, giving the neck and shoulders some recovery time between sessions, especially early in training.
Is shoulder stand good before bed? Some practitioners find it calming as part of an evening routine, though the mild stimulation some people feel near the thyroid area can be energizing rather than sedating for others. Test it earlier in the day first if you are unsure how your body responds.
Should I feel my pulse in my neck during shoulder stand? No. If you feel throbbing, pressure, or your pulse strongly in your neck or head, come down immediately and reassess your setup or blood pressure with a doctor.
Further Reading and Related Practice
If you want to learn more about safe yoga inversions in general, check out our detailed guide for practical tips and expert advice in the advanced yoga poses pillar page.
To get a better understanding of shoulder and core prep work for this pose, our guide to core strength poses breaks down exactly what to expect before you attempt a longer hold.
Want to learn more about building the wrist and shoulder stability this pose demands? Read our latest blog post on crow pose, which trains a similar strength pattern in an upright position.
For a broader look at safe inversion setup from other respected teachers, Art of Living’s shoulder stand guide and Byron Yoga’s breakdown of Salamba Sarvangasana are both worth a read, along with Toward Yoga’s piece on why some teachers call it the “queen of yoga poses”.
You can also explore our full pose library on the RealYogaHub homepage for more tutorials organized by skill level.
Conclusion
Shoulder stand has earned its reputation as one of yoga’s more intimidating poses, and honestly, some of that caution is deserved. The neck is not built to be a foundation. But when you shift the load onto your shoulders and upper arms, protect your neck with a folded blanket, and build up through prep poses instead of forcing the full shape, sarvangasana becomes one of the more rewarding poses in an intermediate practice. Listen to your body, skip it entirely if you fall into any of the contraindicated categories above, and when in doubt, ask a teacher to check your setup in person before you hold it for any real length of time.
Quick Quiz: Test What You Learned
1. Where should your body weight sit in a safe shoulder stand? A) On your neck and head B) On your shoulders and upper arms C) On your lower back
2. Which of these is a reason to skip shoulder stand? A) You are well-rested B) You have uncontrolled high blood pressure C) You practiced yoga yesterday
3. What should you place under your shoulders for safer setup? A) A yoga block under your head B) Nothing at all C) A folded blanket, with your head off the blanket
4. What is a good counterpose after shoulder stand? A) Fish pose B) Another inversion immediately C) Sitting cross-legged with a rounded back
5. How should beginners approach hold time? A) Start with 3-5 minutes right away B) Start with 15-30 seconds and build gradually C) Hold until it hurts, then stop
Answers: 1-B, 2-B, 3-C, 4-A, 5-B
References
- Yoga Journal, “Neck Safety and Supported Shoulderstand,” anatomy breakdown of cervical spine mechanics in sarvangasana
- Apollo247 Health Library, “Sarvangasana: Benefits and Precautions,” medically reviewed contraindication list
- FitCraft, “Shoulder Stand Pose: Form Guide,” 2026 setup and contraindication summary
- Art of Living, Shoulder Stand Guide
- Byron Yoga Centre, Salamba Sarvangasana Breakdown
- Toward Yoga, Shoulderstand: The Queen of Yoga Poses
- B.K.S. Iyengar, Light on Yoga, traditional text reference on Salamba Sarvangasana