
I still remember my first real attempt at sun salutation steps for beginners. It was 6:40 a.m. on a cold March morning in 2014, my mat was crooked, my hamstrings were furious, my breath had zero rhythm with my movement. Twelve years later, this same sequence is still the first thing I teach every new student, because nothing builds strength, flexibility, focus faster than ten honest minutes of Surya Namaskar.
This guide breaks Sun Salutation A and B into plain, no-guesswork steps you can follow today, even if you have never rolled out a mat before. You will get exact breath cues, common mistakes to avoid, a printable-style pose chart, real numbers from recent yoga research so you know this practice is worth your morning. Want to learn more about 10 hip opening yoga poses read our latest blog post
Key Takeaways
| What You’ll Learn | Quick Answer |
|---|---|
| What sun salutation steps for beginners actually mean | A 12-pose flow (Sun Salutation A) plus a stronger 19-pose flow (Sun Salutation B) linked to breath |
| Best time to practice | Morning, on an empty stomach, 5 to 15 minutes |
| Rounds for beginners | 3 to 5 rounds of Sun Salutation A before adding B |
| Main benefit | Full-body warm-up, better flexibility, lower stress in as little as 3 weeks |
| Biggest mistake | Holding the breath instead of syncing it with movement |
| Where to start | This surya namaskar tutorial, step by step, below |
What Is Sun Salutation, Really
Surya Namaskar translates loosely to “greeting the sun.” In practice it is a linked sequence of poses, each one tied to an inhale or an exhale, moving your spine through forward folds, backbends, plank holds, downward-facing shapes. It is not a stretch. It is not cardio either. It sits in that useful middle zone, warming muscles, mobilizing joints, quietly training your nervous system to slow down.
If this is your very first time on a mat, I would actually start one step earlier with this best 10-minute morning yoga routine for beginners, then come back here once your body knows what a forward fold feels like. For a broader map of everything else worth learning, our 50 best yoga poses for beginners at home guide is the pillar resource this entire site is built around.
Why This Sequence Still Matters in 2026
Yoga has not slowed down. Recent industry tracking puts the number of regular yoga practitioners in the United States at more than 34 million people, roughly 11% of the population, spending collectively over $16 billion a year on classes, gear, retreats. What stands out to me is not the size of that number, it is how much of that growth comes from people practicing at home, often starting with exactly this sequence, because sun salutations need zero equipment, zero studio membership, roughly 5 minutes.
| Benefit | What the Research Shows |
|---|---|
| Flexibility | Consistent forward-fold, backbend flow improves spinal and hamstring range within weeks |
| Stress reduction | Linked breathing practices are associated with lower cortisol and reported anxiety |
| Strength | Plank, chaturanga, downward dog build shoulder and core endurance without weights |
| Weight management | Practitioners doing moderate flow classes 3 times weekly showed an average 3.5 kg (7.7 lb) shift over 3 months in tracked studies |
| Habit building | Home practitioners now make up close to 40% of all practitioners, often starting with sun salutations |
Numbers aside, here is the honest reason I still teach this first: a beginner who learns proper sun salutation steps rarely quits yoga in month one. The sequence gives your body a repeatable win, something to master before week two even arrives.
Sun Salutation A: The Complete Beginner Breakdown
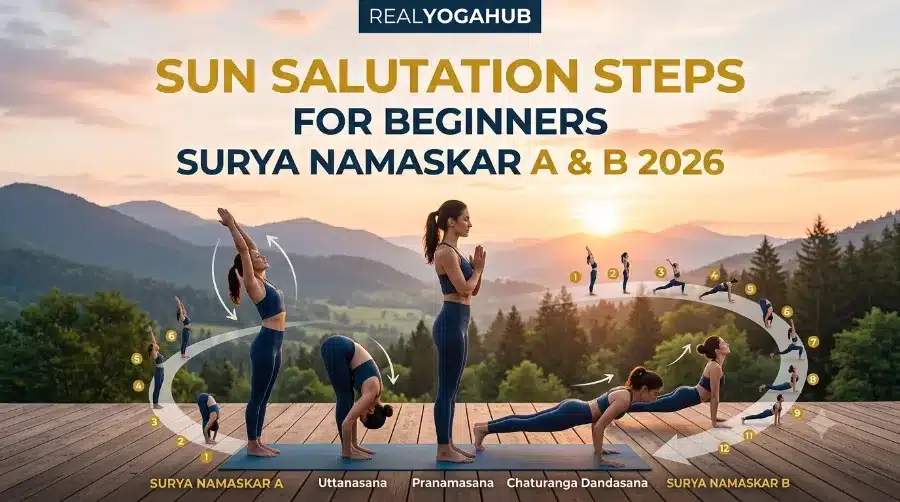
Sun Salutation A is the shorter, gentler of the two, 12 poses total, a perfect entry point if you are brand new. Move slowly through your first few rounds, add breath once the shapes feel familiar.
- Mountain Pose (Tadasana) – Stand tall, feet hip-width apart, palms together at your chest. Inhale here, root through all four corners of both feet.
- Upward Salute (Urdhva Hastasana) – Inhale, sweep your arms overhead, gently arch back from your upper spine, not your lower back.
- Standing Forward Fold (Uttanasana) – Exhale, hinge from your hips, fold forward, let your knees bend generously if your hamstrings are tight.
- Halfway Lift (Ardha Uttanasana) – Inhale, lift your chest halfway, fingertips to shins, spine long.
- Low Lumbar or Plank Step-Back – Exhale, step or float your feet back into plank, shoulders stacked over wrists.
- Knees-Chest-Chin or Chaturanga – Exhale further, lower with control, knees can rest on the mat for beginners.
- Cobra or Upward Dog (Urdhva Mukha Svanasana) – Inhale, press up through your hands, open your chest, keep elbows soft.
- Downward Dog (Adho Mukha Svanasana) – Exhale, lift hips high, press the mat away, pedal your heels for a few breaths.
- Halfway Lift (return) – Inhale, step or hop forward, lift halfway again.
- Standing Forward Fold – Exhale, fold fully.
- Upward Salute – Inhale, rise, sweep arms overhead.
- Mountain Pose – Exhale, hands return to your chest.
For a deeper look at pose 8 specifically, since it shows up constantly across this flow, our full breakdown of the downward dog benefits and modifications is worth bookmarking.
Beginner Cues That Actually Help
- Bend your knees generously in every forward fold, straight legs are not the goal here, a happy lower back is.
- Keep your gaze soft, chin slightly tucked in plank, never let your neck crane upward.
- If chaturanga strains your shoulders, drop your knees to the mat first, build strength gradually.
Sun Salutation B: Adding Strength and Heat
Once 3 to 5 rounds of Sun Salutation A feel steady, usually somewhere between week two, week four, Sun Salutation B is the natural next step. It adds Chair Pose, Warrior I on both sides, running to roughly 19 poses per full round, generating noticeably more internal heat. To get a better understanding of 5 Yoga Poses to Avoid With Bad Knees our guide breaks down exactly what to expect.
- Mountain Pose – Start standing, hands at your chest.
- Chair Pose (Utkatasana) – Inhale, bend your knees, sweep arms up, sit your hips back like lowering into an invisible chair.
- Standing Forward Fold – Exhale, fold forward.
- Halfway Lift – Inhale, lift halfway.
- Plank to Chaturanga – Exhale, step back, lower with control.
- Upward Dog – Inhale, open your chest.
- Downward Dog – Exhale, lift your hips.
- Right Warrior I (Virabhadrasana I) – Inhale, step your right foot forward between your hands, spin your back heel down, rise into a lunge with arms overhead.
- Plank – Exhale, step back to plank.
- Chaturanga to Upward Dog – Flow through with your breath.
- Downward Dog – Exhale, reset.
- Left Warrior I – Inhale, step your left foot forward, mirror the same shape.
- Plank – Exhale, step back.
- Chaturanga, Upward Dog – Continue the flow.
- Downward Dog – Hold for 3 to 5 breaths here, this is your reset point.
- Halfway Lift – Inhale, step forward, lift halfway.
- Standing Forward Fold – Exhale, fold.
- Chair Pose – Inhale, rise back up.
- Mountain Pose – Exhale, hands return to your heart.
Warrior I tends to wobble for most beginners at first, so if your back knee or hip feels unstable there, our warrior pose guide for beginners has modification options worth trying before your next round.
A Real Beginner’s Timeline
One of my longtime students, a 34-year-old nurse from Ohio, started with 3 rounds of Sun Salutation A in January 2025, nothing else, 6 minutes a day before her shift. By March 2025, 10 weeks later, she had added full Sun Salutation B, was holding downward dog for 8 breaths instead of 2, reported her lower back pain during long shifts had dropped noticeably. Her only complaint, she said, was that she wished she had started sooner.
If lower back pain is part of your own story, it is worth pairing this practice with our dedicated yoga poses for back pain relief list, since a few gentle additions can make a real difference alongside your morning flow.
Common Mistakes Beginners Make
- Rushing the breath. Your breath should set the pace, not your muscles. Slow down until the two match naturally.
- Skipping Child’s Pose when tired. There is no rule against resting mid-flow. Drop into child’s pose any time your body asks for it, then rejoin the sequence.
- Comparing your flexibility to someone else’s. Sun salutation steps for beginners are not a performance, they are a daily practice, progress shows up in weeks, not minutes.
- Practicing on a full stomach. Give yourself at least 1 to 2 hours after eating.
- Ignoring wrist pain. Spread your fingers wide, press firmly through your knuckles, this alone fixes most wrist discomfort in plank.
For students focused specifically on loosening tight hips or hamstrings before attempting full rounds, our 30-day flexibility plan pairs well as a companion practice.
You can also compare how other teachers sequence this same flow, this sun salutation sequence breakdown and this beginner-focused Sun Salutation A tutorial both offer useful visual references, while this detailed step-by-step guide covers alignment cues from a slightly different teaching lineage.
FAQ: Sun Salutation Steps for Beginners
How many rounds of sun salutation should a beginner do?
Start with 3 rounds of Sun Salutation A daily for your first two weeks, build toward 5, then introduce Sun Salutation B slowly.
Is Sun Salutation A or B better for beginners?
Sun Salutation A always comes first. It is gentler, shorter, builds the foundation Sun Salutation B later relies on.
Can I do sun salutations every day?
Yes, most practitioners do this daily. Your body adapts quickly to this specific sequence, daily repetition is actually part of why it works.
What if I cannot touch my toes in the forward fold?
Bend your knees. Nobody starts with straight-leg forward folds, tight hamstrings loosen gradually with consistent practice.
How long before I see results?
Most students notice better flexibility, calmer mornings within 3 to 4 weeks of consistent practice, real strength gains take closer to 8 weeks.
Quick Quiz: Test Your Sun Salutation Knowledge
1. How many poses make up Sun Salutation A?
a) 8
b) 12
c) 19
2. Which pose appears in both Sun Salutation A and B?
a) Warrior I
b) Chair Pose
c) Downward Dog
3. What should guide your pace through the sequence?
a) Your breath
b) Background music
c) A timer
4. Which pose is unique to Sun Salutation B?
a) Mountain Pose
b) Chair Pose
c) Cobra Pose
5. How many rounds should a beginner start with?
a) 10 to 12
b) 3 to 5
c) 1
Answer Key: 1-b, 2-c, 3-a, 4-b, 5-b
Conclusion
Sun salutation steps for beginners are not complicated once broken into their individual pieces, they simply reward patience over perfection. Start with 3 slow rounds of Sun Salutation A this week, let your breath lead rather than your ego, add Sun Salutation B only once the first sequence feels like home in your body. Twelve years into teaching this same flow, I can tell you the students who stick with yoga long term are almost always the ones who mastered this exact morning sequence first.
References
- Statista Research Department, “Yoga Participation Levels in the U.S.” (2025) Sun Salutation Steps
- Yogi Times, “Yoga Statistics and Regional Trends” (2025) Sun Salutation Steps
- Zippia, “Yoga Industry Statistics and Revenue” (2026) Sun Salutation Steps
- CDC, “Yoga Among Adults Age 18 and Older: United States” (2022) Sun Salutation Steps